Saving an Excel graph as an image can be a convenient way to share your data visualizations with others, use them in presentations, or include them in reports. Excel provides several methods to achieve this, and we will explore five ways to save an Excel graph as an image.
Understanding the Importance of Saving Excel Graphs as Images
Before we dive into the methods, it's essential to understand why saving Excel graphs as images is crucial. By saving your graphs as images, you can:
- Share your data visualizations with others who may not have Excel or access to the original file.
- Use your graphs in presentations, reports, or other documents without worrying about compatibility issues.
- Protect your data by sharing only the visual representation, rather than the underlying data.
Method 1: Using the "Save as Picture" Option

One of the simplest ways to save an Excel graph as an image is to use the "Save as Picture" option. To do this:
- Select the graph you want to save as an image.
- Right-click on the graph and select "Save as Picture" from the context menu.
- Choose the desired file format (such as JPEG, PNG, or GIF) and location for the image file.
- Click "Save" to save the graph as an image.
Method 2: Using the "Copy" and "Paste" Method
Another way to save an Excel graph as an image is to use the "Copy" and "Paste" method. To do this:
- Select the graph you want to save as an image.
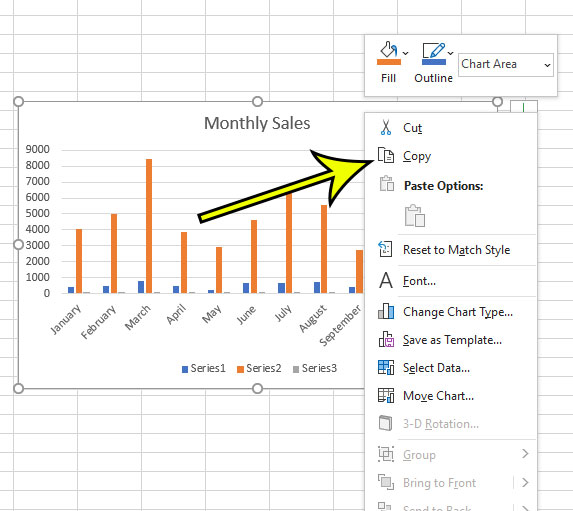
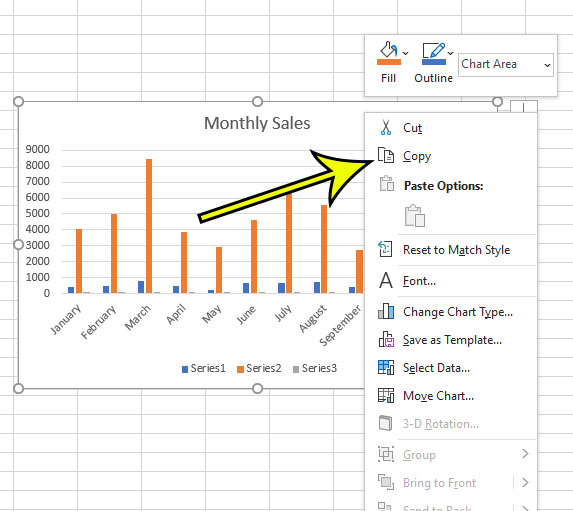
- Right-click on the graph and select "Copy" from the context menu.
- Open a new document or presentation in a program like Microsoft Word or PowerPoint.
- Right-click and select "Paste" to paste the graph as an image.
- You can then save the image file by right-clicking on it and selecting "Save as Picture."
Method 3: Using the "Snipping Tool" Method

The Snipping Tool is a built-in Windows utility that allows you to capture screenshots and save them as images. To use the Snipping Tool method:
- Select the graph you want to save as an image.
- Open the Snipping Tool and select "New" to create a new snip.
- Drag the crosshair to select the area of the graph you want to capture.
- Release the mouse button to capture the graph as an image.
- Save the image file by clicking "File" > "Save As" and choosing the desired file format and location.
Method 4: Using VBA Macros
For more advanced users, you can use VBA macros to save Excel graphs as images. To do this:
- Open the Visual Basic Editor by pressing "Alt + F11" or navigating to "Developer" > "Visual Basic" in the ribbon.
- In the Visual Basic Editor, create a new module by clicking "Insert" > "Module."
- Paste the following code into the module:
Sub SaveGraphAsImage()
    Dim graph As Chart
    Set graph = ActiveSheet.ChartObjects(1).Chart
    graph.Export Filename:="C:\graph.jpg", FilterName:="JPEG"
End Sub
- Replace "C:\graph.jpg" with the desired file path and name for the image file.
- Click "Run" to execute the macro and save the graph as an image.
Method 5: Using Online Tools

There are also several online tools available that allow you to save Excel graphs as images. Some popular options include:
- SmallPDF: A free online tool that allows you to upload your Excel file and download the graph as an image.
- Excel-Tool: A free online tool that allows you to upload your Excel file and save the graph as an image in various formats.
- Online-Convert: A free online tool that allows you to upload your Excel file and convert the graph to an image in various formats.
Conclusion
Saving Excel graphs as images can be a convenient way to share your data visualizations with others. In this article, we explored five methods for saving Excel graphs as images, including using the "Save as Picture" option, the "Copy" and "Paste" method, the Snipping Tool method, VBA macros, and online tools. By following these methods, you can easily save your Excel graphs as images and share them with others.


How do I save an Excel graph as an image?
+You can save an Excel graph as an image by using the "Save as Picture" option, the "Copy" and "Paste" method, the Snipping Tool method, VBA macros, or online tools.
What are the different methods for saving Excel graphs as images?
+The different methods for saving Excel graphs as images include using the "Save as Picture" option, the "Copy" and "Paste" method, the Snipping Tool method, VBA macros, and online tools.
Can I use VBA macros to save Excel graphs as images?
+Yes, you can use VBA macros to save Excel graphs as images. You can create a macro that exports the graph as an image file.