
Excel is a powerful tool for data analysis, and creating a drop-down list is an excellent way to organize and simplify data entry. A drop-down list allows you to select from a predefined set of options, making it easier to enter data accurately and efficiently. In this article, we will explore five ways to create a drop-down list in Excel Mac.
Creating a drop-down list in Excel Mac is a valuable skill, especially for those who work with data regularly. By the end of this article, you will be able to create a drop-down list using various methods, making your data entry tasks more efficient and accurate.
Method 1: Using the Data Validation Feature

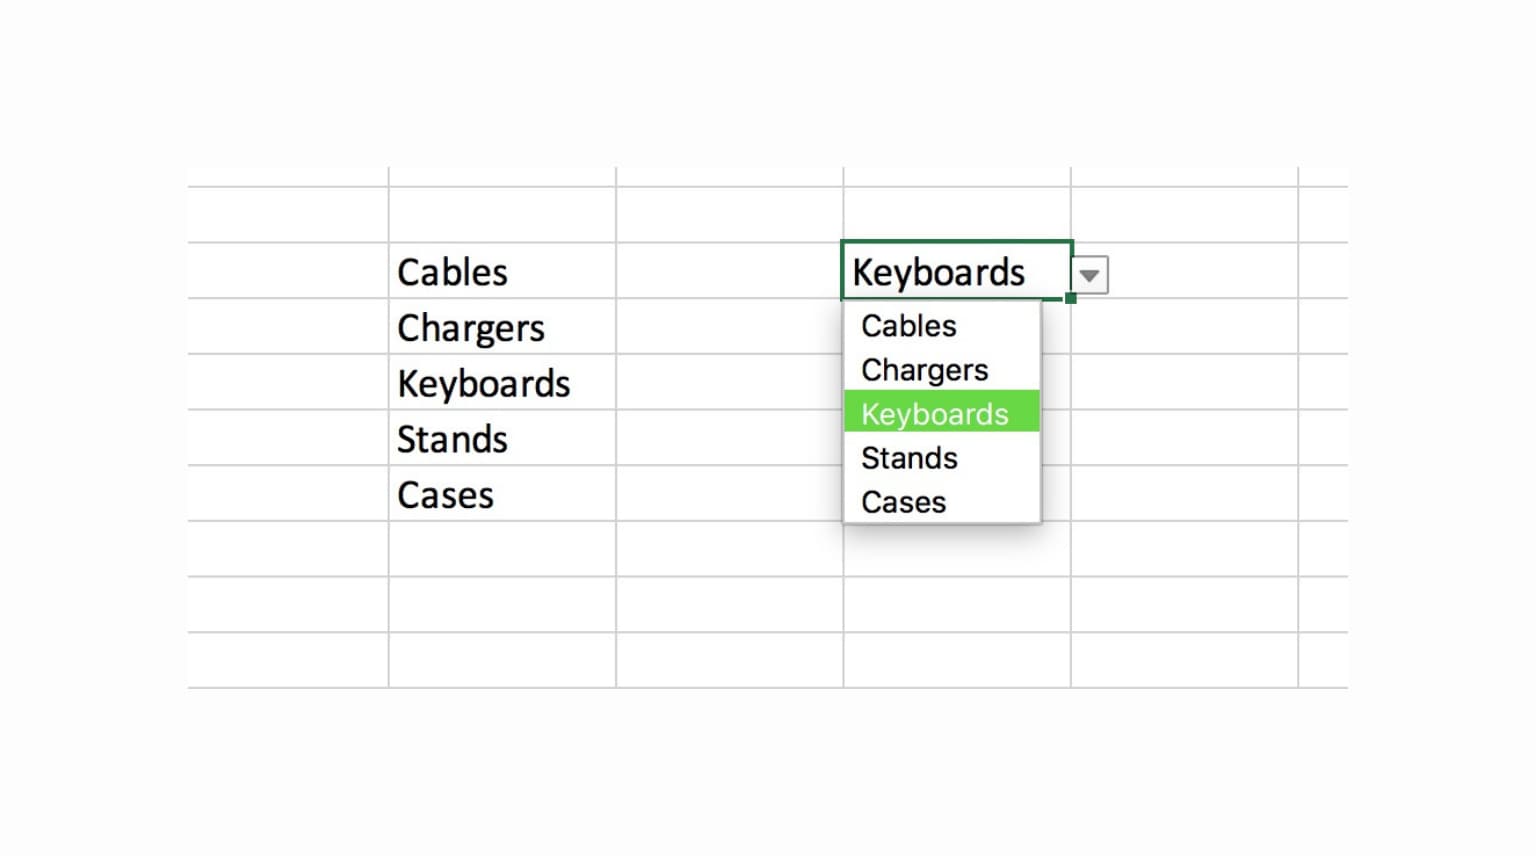
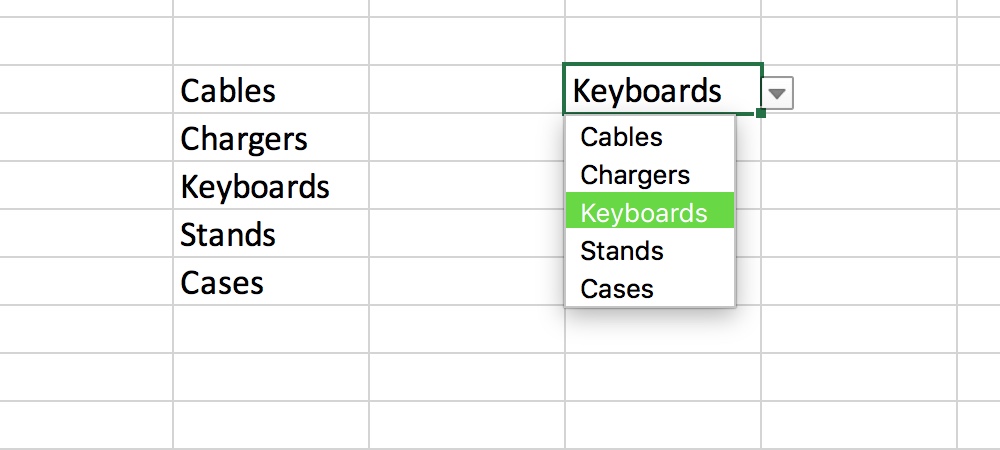
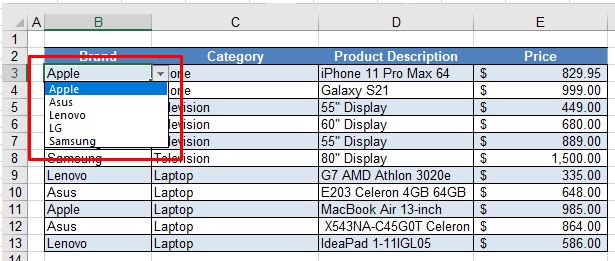
The Data Validation feature in Excel Mac is a powerful tool that allows you to create a drop-down list with ease. Here's how to use it:
- Select the cell where you want to create the drop-down list.
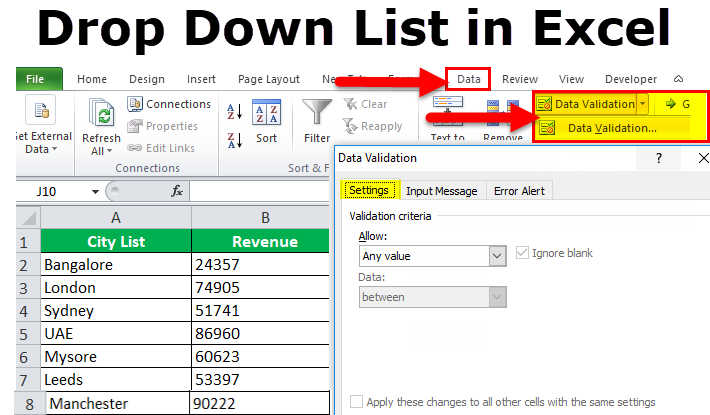
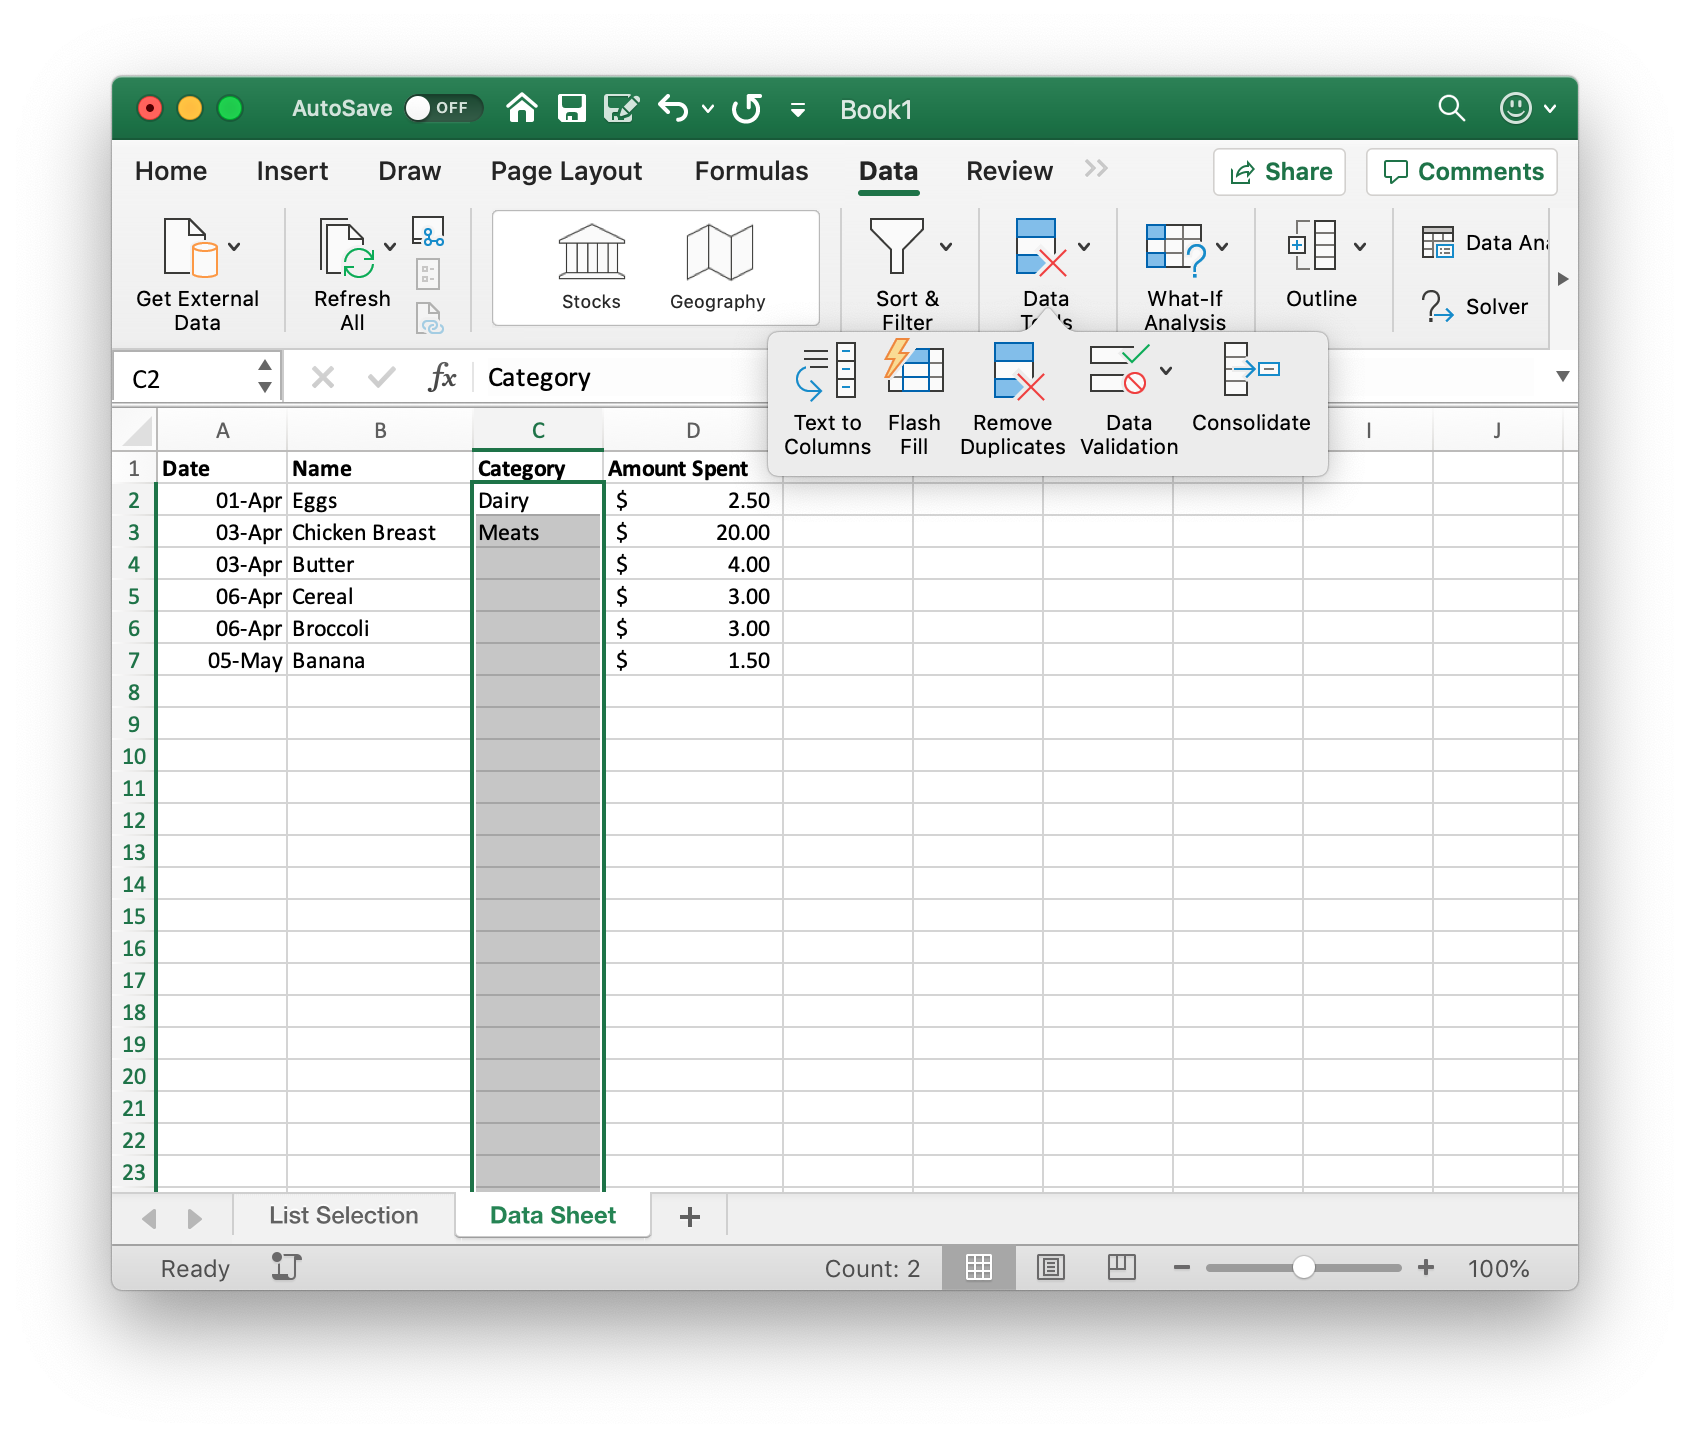
- Go to the "Data" tab in the ribbon.
- Click on "Data Validation" in the "Data Tools" group.
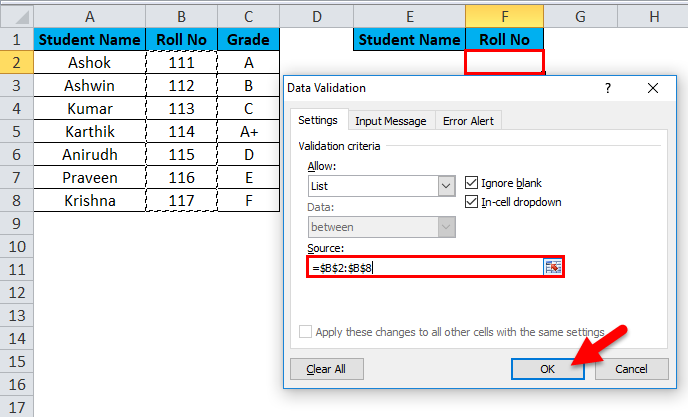
- In the "Data Validation" dialog box, select "List" from the "Allow" dropdown menu.
- In the "Source" field, enter the range of cells that contains the list of options you want to display in the drop-down list.
- Click "OK" to apply the changes.
Example: Creating a Drop-Down List of Countries
Suppose you have a list of countries in cells A1:A10, and you want to create a drop-down list in cell B1. Here's how to do it:
- Select cell B1.
- Go to the "Data" tab in the ribbon.
- Click on "Data Validation" in the "Data Tools" group.
- In the "Data Validation" dialog box, select "List" from the "Allow" dropdown menu.
- In the "Source" field, enter the range of cells A1:A10.
- Click "OK" to apply the changes.
Method 2: Using a Named Range

Creating a named range is another way to create a drop-down list in Excel Mac. Here's how to do it:
- Select the range of cells that contains the list of options you want to display in the drop-down list.
- Go to the "Formulas" tab in the ribbon.
- Click on "Define Name" in the "Defined Names" group.
- In the "New Name" dialog box, enter a name for the range, such as "Countries".
- Click "OK" to apply the changes.
- Select the cell where you want to create the drop-down list.
- Go to the "Data" tab in the ribbon.
- Click on "Data Validation" in the "Data Tools" group.
- In the "Data Validation" dialog box, select "List" from the "Allow" dropdown menu.
- In the "Source" field, enter the named range, such as "=Countries".
- Click "OK" to apply the changes.
Example: Creating a Drop-Down List of Departments
Suppose you have a list of departments in cells A1:A5, and you want to create a drop-down list in cell B1. Here's how to do it:
- Select cells A1:A5.
- Go to the "Formulas" tab in the ribbon.
- Click on "Define Name" in the "Defined Names" group.
- In the "New Name" dialog box, enter a name for the range, such as "Departments".
- Click "OK" to apply the changes.
- Select cell B1.
- Go to the "Data" tab in the ribbon.
- Click on "Data Validation" in the "Data Tools" group.
- In the "Data Validation" dialog box, select "List" from the "Allow" dropdown menu.
- In the "Source" field, enter the named range, such as "=Departments".
- Click "OK" to apply the changes.
Method 3: Using a Table

Creating a table is another way to create a drop-down list in Excel Mac. Here's how to do it:
- Select the range of cells that contains the list of options you want to display in the drop-down list.
- Go to the "Insert" tab in the ribbon.
- Click on "Table" in the "Tables" group.
- In the "Create Table" dialog box, select the range of cells.
- Click "OK" to apply the changes.
- Select the cell where you want to create the drop-down list.
- Go to the "Data" tab in the ribbon.
- Click on "Data Validation" in the "Data Tools" group.
- In the "Data Validation" dialog box, select "List" from the "Allow" dropdown menu.
- In the "Source" field, enter the range of cells that contains the table.
- Click "OK" to apply the changes.
Example: Creating a Drop-Down List of Cities
Suppose you have a list of cities in cells A1:A10, and you want to create a drop-down list in cell B1. Here's how to do it:
- Select cells A1:A10.
- Go to the "Insert" tab in the ribbon.
- Click on "Table" in the "Tables" group.
- In the "Create Table" dialog box, select the range of cells.
- Click "OK" to apply the changes.
- Select cell B1.
- Go to the "Data" tab in the ribbon.
- Click on "Data Validation" in the "Data Tools" group.
- In the "Data Validation" dialog box, select "List" from the "Allow" dropdown menu.
- In the "Source" field, enter the range of cells that contains the table.
- Click "OK" to apply the changes.
Method 4: Using a Combo Box

Creating a combo box is another way to create a drop-down list in Excel Mac. Here's how to do it:
- Select the cell where you want to create the drop-down list.
- Go to the "Developer" tab in the ribbon.
- Click on "Insert" in the "Controls" group.
- In the "Insert" dialog box, select the "Combo Box" option.
- Click "OK" to apply the changes.
- Right-click on the combo box and select "Format Control".
- In the "Format Control" dialog box, select the range of cells that contains the list of options.
- Click "OK" to apply the changes.
Example: Creating a Drop-Down List of Colors
Suppose you have a list of colors in cells A1:A5, and you want to create a drop-down list in cell B1. Here's how to do it:
- Select cell B1.
- Go to the "Developer" tab in the ribbon.
- Click on "Insert" in the "Controls" group.
- In the "Insert" dialog box, select the "Combo Box" option.
- Click "OK" to apply the changes.
- Right-click on the combo box and select "Format Control".
- In the "Format Control" dialog box, select the range of cells A1:A5.
- Click "OK" to apply the changes.
Method 5: Using VBA

Creating a drop-down list using VBA is another way to create a drop-down list in Excel Mac. Here's how to do it:
- Open the Visual Basic Editor by pressing "Alt + F11" or by navigating to "Developer" > "Visual Basic".
- In the Visual Basic Editor, click on "Insert" > "Module" to insert a new module.
- In the module, paste the following code:
Sub CreateDropDownList() Dim cell As Range Set cell = Range("B1") cell.Validation.Add Type:=xlValidateList, _ AlertStyle:=xlValidAlertStop, _ Operator:=xlEqual, _ Formula1:="=A1:A5" End Sub
- Save the module by clicking "File" > "Save".
- Close the Visual Basic Editor.
- Go back to the Excel worksheet and select cell B1.
- Press "Alt + F8" to run the macro.
Example: Creating a Drop-Down List of Fonts
Suppose you have a list of fonts in cells A1:A5, and you want to create a drop-down list in cell B1. Here's how to do it:
- Open the Visual Basic Editor by pressing "Alt + F11" or by navigating to "Developer" > "Visual Basic".
- In the Visual Basic Editor, click on "Insert" > "Module" to insert a new module.
- In the module, paste the following code:
Sub CreateDropDownList() Dim cell As Range Set cell = Range("B1") cell.Validation.Add Type:=xlValidateList, _ AlertStyle:=xlValidAlertStop, _ Operator:=xlEqual, _ Formula1:="=A1:A5" End Sub
- Save the module by clicking "File" > "Save".
- Close the Visual Basic Editor.
- Go back to the Excel worksheet and select cell B1.
- Press "Alt + F8" to run the macro.
Conclusion
In conclusion, creating a drop-down list in Excel Mac is a valuable skill that can help you to organize and simplify data entry. In this article, we have explored five ways to create a drop-down list, including using the Data Validation feature, a named range, a table, a combo box, and VBA. By using these methods, you can create a drop-down list that meets your specific needs and makes your data entry tasks more efficient and accurate.


What is a drop-down list in Excel?
+A drop-down list in Excel is a feature that allows you to select from a predefined set of options. It is a useful tool for data entry, as it helps to ensure accuracy and consistency.
How do I create a drop-down list in Excel?
+There are several ways to create a drop-down list in Excel, including using the Data Validation feature, a named range, a table, a combo box, and VBA.
What are the benefits of using a drop-down list in Excel?
+The benefits of using a drop-down list in Excel include improved accuracy and consistency, reduced data entry errors, and increased efficiency.

:max_bytes(150000):strip_icc()/ExcelDropDownList2.5-2fdd2c3e589c46e8bf125faf6b33c79c.jpg)



:max_bytes(150000):strip_icc()/create-drop-down-list-in-excel-R4-5c1a6935c9e77c00015cc442.jpg)
